

We research everything we recommend. When you buy through our links, we may earn a commission. Learn more

Buying guide · 10 min read · Updated October 2, 2026

6 Best Solar Charge Controller For RV in 2026: A Practical RV Guide

How to size a solar charge controller for an RV roof array and house battery bank, with six compact picks and honest limits on each.

Bowen HigginsBy Bowen HigginsRV Editor at RV Gear Lab6 products comparedSpec-sheet researched

At a glance

Our top picks

Sizing is the real RV question: how many roof panels you have, what voltage your house bank runs at and how much of that array the controller can actually pass to the batteries. This guide frames six controllers around that sizing math, from 8A units for a single small panel to a 30A PWM that accepts about 450W on a 12V bank.

Most of the picks here are small, so this guide says clearly which array sizes each handles and when you would need to step up to a larger controller. The ranking favors units that name the battery chemistries and panel wattage they accept over units that leave you guessing.

RV Gear Lab field notes

The Rig Fit Check

Start with the job
BougeRV Li 30A PWM Solar Charge Controller 12V 24V with Backlit Display leads this shortlist for Roof arrays. Use that fit as a reference point, then compare the alternatives against your own space and workload.
Specs that separate the picks
The first details to compare are 30A PWM, 12V/24V, 10A PWM, 12V/24V auto, 10A MPPT, 12V only. Confirm the exact model and included components before ordering.
Trade-off to plan for
PWM, so extra panel voltage is wasted

Before you buy

What Matters Before You Choose a Solar Charge Controller For RV

Key buying criteria so you get the right fit the first time.

  1. 01

    Roof array wattage math

    Add up the watts of every panel you plan to install, then divide by the battery voltage to find the minimum controller amps. For example, 400W on a 12V bank is about 33A, so a 30A PWM is already stretched and a 40A MPPT is more comfortable. Compare that number to the amp rating and the maximum PV watts in the listing.

  2. 02

    House bank voltage

    Most RVs run a 12V house bank, but some larger rigs use 24V to cut current. A controller must match the bank voltage, and some units auto-detect while others are 12V only. Check your bank voltage on the battery or inverter label and compare it to the listing.

  3. 03

    Panel wiring and PV limit

    Parallel wiring keeps voltage low and works with most small controllers, while series wiring raises voltage and needs a higher PV limit. BougeRV Li 30A lists a 55V maximum, so a series string must stay under that in cold weather. Find your panels' Voc, multiply by the number in series and add margin.

  4. 04

    Cold-weather behavior

    LiFePO4 batteries should not accept charge below freezing, and flooded batteries want temperature compensation. A controller or BMS that blocks cold charging protects an expensive bank. Check whether your battery has its own low-temperature protection before relying on the controller.

  5. 05

    Mounting and wire length

    Controllers work best close to the battery with short, thick cable, because long runs drop voltage. Compact units like Voltset 10A can tuck into tight bays, while 30A units need larger terminals. Measure the run before buying and choose wire gauge for the amps.

Our standards

Why You Can Trust RV Gear Lab

At RV Gear Lab, we compare products based on rig fit and power or hookup compatibility, verified specifications, usability, setup requirements, weight, durability, and real-world trade-offs. We do not rank products purely on marketing claims or commission rates.

We have not personally tested every product listed. Where hands-on testing is not available, recommendations are based on verified manufacturer specifications, product documentation, use-case fit, and comparative research.

How we review RV gear →

Detailed reviews

The 6 best solar charge controller for rv, explained

01
Best for: Roof arrays

Our take

Best for a travel trailer or camper with two to four 100W panels.

Why it made the shortlist

BougeRV's Li 30A is a PWM controller for 12V or 24V banks that accepts 450W on 12V (900W on 24V) at a maximum 55V PV input. Its backlit LCD cycles PV current and battery voltage and shows dedicated icons for LFP and other lithium types.

It is the strongest PWM option for a mid-size RV roof, as long as your panels are 12V-class rather than high-voltage.

What works

  • Handles 450W of panels on a 12V bank
  • LCD icons for LFP and other lithium types
  • Backlit display cycles PV and battery readings
  • Three pairs of spade terminals for neat wiring

Watch out for

  • PWM, so extra panel voltage is wasted
  • 55V ceiling limits series strings
The catch
The tradeoff is PWM regulation and a 55V PV limit.
02
Best for: Small van installs

Our take

Best for a small van install with 100 to 150W of panels.

Why it made the shortlist

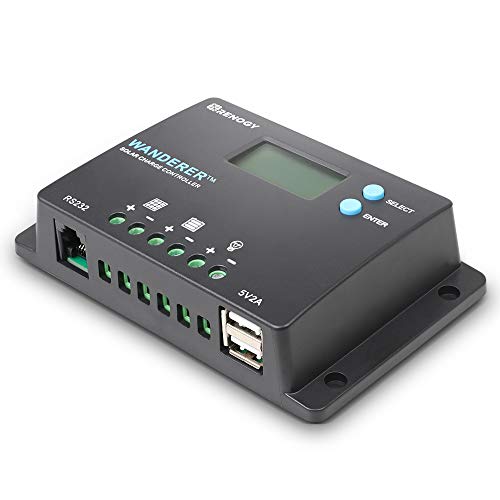
Renogy's Wanderer 10A is a small four-stage PWM for 12V and 24V that fits a van or pop-up with one or two panels. Renogy's Wanderer 10A is a four-stage PWM controller for 12V or 24V systems that lists self-consumption under 10mA. It has a backlit LCD, USB charging and a lithium setting with manual activation.

Compared with SUNAPEX MPPT 10A it is PWM and supports 24V.

It is a small, simple unit for a van or pop-up camper with one or two panels.

What works

  • Under 10mA of its own battery draw
  • Four-stage PWM charging
  • Lithium option with manual activation
  • Backlit LCD with USB charging

Watch out for

  • 10A suits only small arrays
  • Monitoring is limited to its own LCD
03
Best for: Portable MPPT

Our take

Best for portable panels feeding a small 12V battery.

Why it made the shortlist

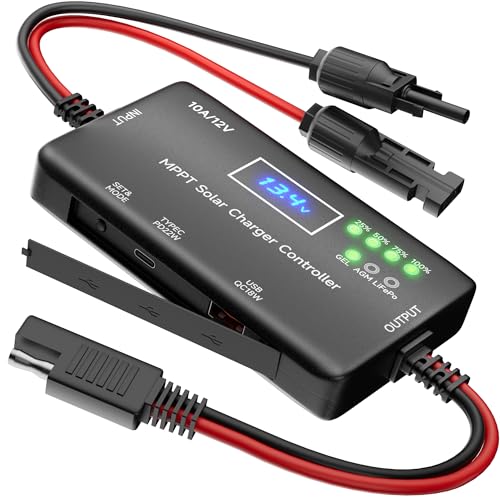
SUNAPEX's 12V 10A controller is described as MPPT and is designed for panels that do not have an integrated controller. It uses SAE connectors, an LCD and LED indicators, and offers Type-C and USB output ports.

What works

  • Zero battery drain with built-in diodes
  • SAE connectors for quick setup
  • LCD and LED status indicators
  • Type-C and USB ports for devices

Watch out for

  • Not for panels with built-in controllers
  • 10A suits only one or two small panels
04
Best for: Exposed mounting

Our take

Best for bumper-mounted or exposed installs on a small array.

Why it made the shortlist

SOLPERK's 10A PWM controller is IP67 waterproof and lists 150W at 12V and 300W at 24V. SOLPERK's 10A PWM controller is rated IP67 and identifies 12V or 24V automatically, with 150W maximum at 12V and 300W at 24V. It has an SAE port, two pre-drilled mounting holes and a listed 12-month extended warranty.

It is a tidy small-array controller, not for a full roof.

What works

  • IP67 waterproof for outdoor use
  • Auto-identifies 12V or 24V
  • SAE connector for quick setup
  • 12-month extended warranty listed

Watch out for

  • Only 150W of panels at 12V
  • LED status, no numeric display
05
Best for: Small sealed 12V

Our take

Best for a small sealed 12V battery setup.

Why it made the shortlist

Voltset's 10A controller is built for 12V solar panels and works with 12V LiFePO4, AGM and gel batteries. It carries an IP67 rating, tri-color LEDs for solar input, charging and full battery, and a list of protections.

Compared with SUNAPEX MPPT 10A it uses PWM and simple LEDs.

It suits a small sealed 12V system or a portable panel on a pop-up camper.

What works

  • Works with LiFePO4, AGM and gel batteries
  • Tri-color LEDs show input and full battery
  • Overvoltage, undervoltage and short protection

Watch out for

  • Up to 10A of panel current only
  • LED status only
The catch
It is similar in rating to SOLPERK 10A PWM but lacks 24V and a warranty listing.
06

Best Budget 30A · 6 of 6

30A PWM Solar Charge Controller

Best for: Budget 30A

Our take

Best for a budget 30A step-up for lead-acid users.

Why it made the shortlist

HilapriSol's 30A PWM gives 30A capacity at a low price, with limited detail on battery chemistry. HilapriSol's 30A controller uses pulse width modulation on 12V or 24V systems, with a blue housing and clearly labeled terminals. The listing mentions safeguards against overcharging, over-discharging and short circuits.

Against Renogy Wanderer 10A it offers triple the current.

What works

  • Pulse width modulation regulation up to 30A
  • Clear terminal labels for wiring
  • Overcharge and over-discharge safeguards
  • Short-circuit protection built in

Watch out for

  • Little detail on battery chemistry
  • No numeric display mentioned

Methodology

How We Built This Shortlist

Each pick was assessed across 5 criteria weighted for real-world use.

01

Array sizing

This guide matches each unit's amp rating and wattage limits to typical RV roof arrays.

02

House bank chemistry

Lithium, AGM and gel support were compared since most RV banks are one of these.

03

Mounting realities

Waterproof ratings and cable layout were noted for roof-run and bumper installs.

04

Standby drain

Self-consumption and zero-idle claims matter for storage periods.

05

Honest limits

Picks that are too small for a full roof are identified as such.

Decision guide

Match a Solar Charge Controller For RV to Your RV

By Roof Array Size

Your situationRecommended pickWhy
One portable panel, 100W or lessSUNAPEX MPPT 10A10A MPPT for a single small panel.
One to two panels, up to about 150W on 12VSOLPERK 10A PWMIP67, 150W at 12V.
Small van with a modest arrayRenogy Wanderer 10AFour-stage 10A PWM.
Roof array near 450W on 12VBougeRV Li 30A PWMLists 450W at 12V and 55V PV.
Roof array on a tight budget, lead-acidHilapriSol 30A30A PWM at a low price.

By Budget

BudgetRecommended pick
$10 to $20HilapriSol 30A or Voltset 10A
$10 to $30SOLPERK 10A PWM or SUNAPEX MPPT 10A
$20 to $30Renogy Wanderer 10A or BougeRV Li 30A PWM

Parallel vs Series Wiring

Parallel

Wiring panels in parallel keeps voltage near 20V and adds current, which suits PWM controllers like BougeRV Li 30A PWM and HilapriSol 30A.

Series

Wiring in series raises voltage and cuts current, which lets you use thinner wire but demands a higher PV limit. None of the 10A units here handle long strings, so SOLPERK 10A PWM is a poor match.

Most owners with a small roof array should stay with parallel and a controller like BougeRV Li 30A PWM.

By Battery Chemistry

ChemistryRecommended pick
LiFePO4 house bankVoltset 10A
Lithium icons on the LCD wantedBougeRV Li 30A PWM
AGM or gel, 12V or 24VRenogy Wanderer 10A
MPPT with LiFePO4 on a small panelSUNAPEX MPPT 10A

For Weekend Campers with a Roof Array Specifically

Look for

Look for an amp rating above your array watts divided by 12, a stated wattage limit on 12V and a lithium-friendly profile.

In this comparison

BougeRV Li 30A PWM states 450W at 12V and lists lithium icons, which is the closest fit among these picks for a roof array.

When to Spend More

Spend more if

Spend more if your roof array exceeds roughly 400W, where a larger MPPT outside this list will pass more power than BougeRV Li 30A PWM can.

Save if

Save if you run one or two small panels, where Voltset 10A or SOLPERK 10A PWM is plenty.

FAQ

Before You Bring One Home

What size controller do I need for 400W of RV panels?

Divide 400W by 12V to get about 33A, then pick the next size up. Among these picks, BougeRV Li 30A PWM is the largest and may clip at that size, so consider a bigger MPPT unit.

Can I use my RV's existing controller with lithium batteries?

Only if it has a lithium profile or adjustable voltage. Check the manual or listing for LFP or user-defined settings before switching batteries.

Is MPPT worth it on an RV roof?

Usually yes for arrays above roughly 300W or with higher-voltage panels. For a single small panel, PWM like Renogy Wanderer 10A is adequate.

What is the safest way to wire a RV solar controller?

Place it near the battery, in a dry and ventilated spot, and fuse the battery side. Short thick wires reduce voltage drop, and a waterproof unit like SOLPERK 10A PWM can sit in a bumper bay. On a RV solar controller, double-check polarity at every terminal before powering up and use wire sized for the rated amps.

How should I maintain a RV solar controller?

On a RV solar controller, tighten terminals and inspect cable insulation at the start of each season, and keep vents, fans or heat-sink surfaces free of dust. Check terminals and wire insulation each season, especially after travel vibration. Keep the case clear of dust and moisture.

Bottom line

The short version

Browse more solar charge controller for rv on Amazon →
Bowen Higgins, RV Editor at RV Gear Lab

About the author

Bowen Higgins

RV Editor at RV Gear Lab

Bowen covers RV power, water systems, towing and leveling, upkeep and interior comfort, with a focus on matching gear to the rig, the hookups and the way you actually travel.

More from Bowen →Editorial standards

Keep reading

Related guides