
Practical Camping Guide · 13 min read
How to Use a Canister Stove in Cold Weather
Keep a canister stove burning in the cold with the right fuel blend, a warm canister, wind protection and a regulated or remote stove, plus safe warming tips.

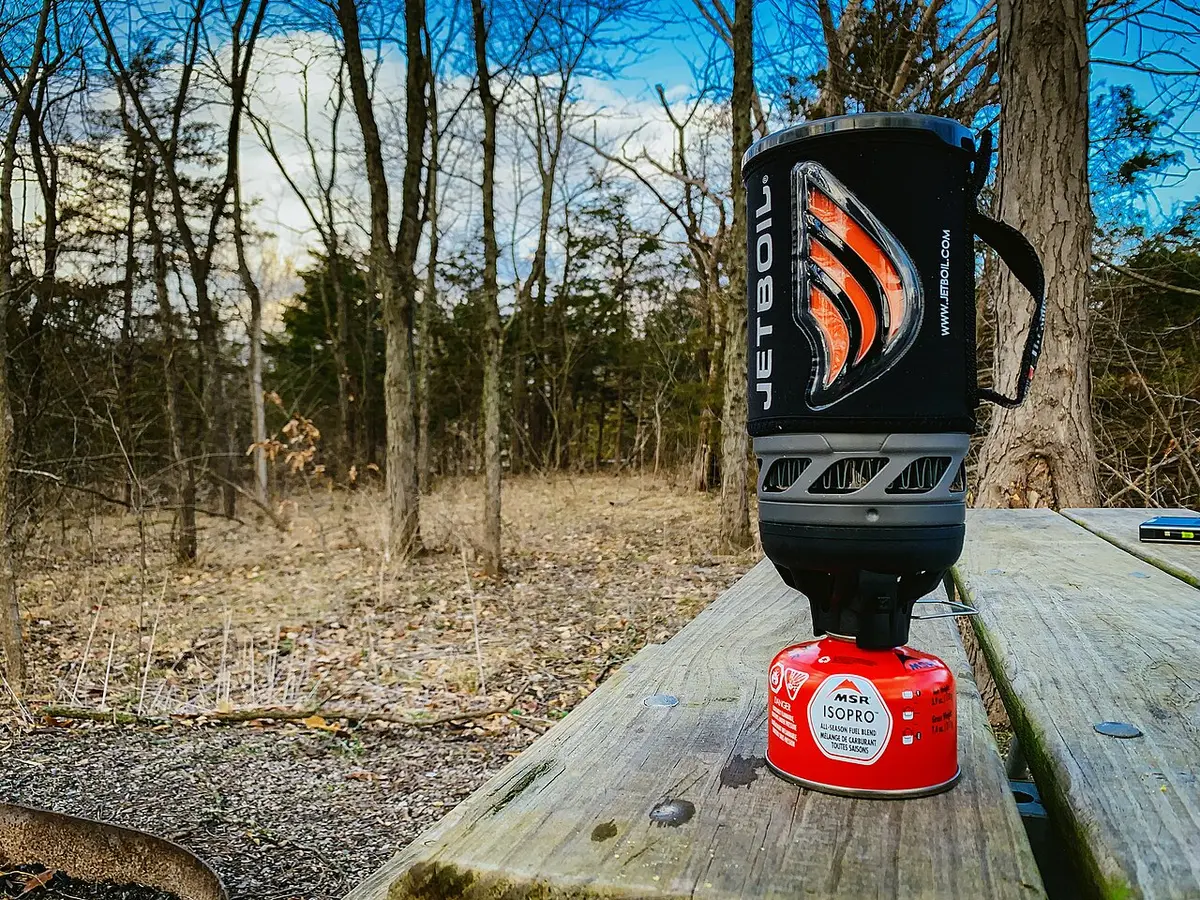
Canister stoves work in the cold if you manage the fuel: choose an isobutane/propane blend (not plain butane), keep the canister warm with body heat or an insulated sleeve, shield the stove from wind, and consider a regulated stove or an inverted-canister setup below roughly 15 to 20 degrees F. The core problem is physics, since the fuel inside the canister is a liquid that has to boil to feed the burner, and cold slows that boiling until the flame sputters or dies.
If you understand why a canister fails in the cold, the fixes are straightforward and cheap. Below is the science in plain terms, a step-by-step cold-weather routine, a table of fuel blends and temperatures, and the safety rules that matter when you are tempted to warm a canister with a flame (do not).
Why canister stoves struggle when it is cold
A camping fuel canister holds liquefied gas under pressure. When you open the valve, liquid inside boils into vapor, and the vapor flows to the burner. Boiling absorbs heat, which cools the canister, and cooling lowers the vapor pressure, which reduces the flow. In warm weather the surroundings supply enough heat to keep up. In cold weather, they do not, and the canister can chill itself into a weak, flickering flame, even to the point of frosting on the outside.
Each fuel component has a boiling point at normal air pressure:
| Fuel | Boiling point (approx.) | Cold-weather behavior |
|---|---|---|
| n-butane | 31 degrees F (-0.5 C) | Stops vaporizing near freezing, poor in the cold |
| Isobutane | 11 degrees F (-12 C) | Works well in mild cold, slows below about 15 F |
| Propane | -44 degrees F (-42 C) | Vaporizes even in deep cold |
A boiling point is not the temperature at which a stove stops working. As the canister cools from its own evaporation, the pressure inside drops, and in practice most blends start to struggle 10 to 20 degrees above their boiling point, especially at a high burn rate. That is why a canister of isobutane can work at 20 degrees F in the sun and fail at 25 degrees F in the shade with the stove on high.
The blend matters more than the brand
Canisters are sold as blends, typically isobutane and propane in a ratio such as 80/20, with some brands using 70/30 or similar for cold-weather versions. Propane raises the pressure at low temperature, but it also burns off first, so as the canister empties the blend shifts toward isobutane and the cold-weather performance falls. A half-empty canister is weaker in the cold than a full one.
| Blend | Typical use | Practical lower limit with a standard stove |
|---|---|---|
| Butane only | Cheap, fine-weather stoves | About 40 degrees F, avoid in the cold |
| Butane/propane mixes | Budget canisters | About 30 degrees F |
| Isobutane/propane 80/20 | Most backpacking canisters | About 15 to 20 degrees F |
| Isobutane/propane 70/30 or higher propane | Cold-weather blends | About 0 to 10 degrees F |
| Pure propane in a refillable bottle | Car camping | Well below zero, but heavy |
These limits are rules of thumb from manufacturer guidance and field experience, and they depend on stove design, wind, altitude and burn rate. Check the manufacturer's stated lowest working temperature for your stove and canister, for example a stated figure around 15 degrees F for a common 85/15 canister with its matching stove. A guide to choosing between fuel types is in propane versus butane camping stoves.
Stove design: regulated, inverted and remote
Not every canister stove handles the cold equally.
Regulated stoves. A regulator keeps the burner pressure steady as the canister pressure falls, so the flame stays consistent through cold and half-empty canisters. Many modern backpacking and camp stoves include one, and it is the single most useful feature for winter use.
Inverted-canister stoves. Some stoves allow you to turn the canister upside down, so liquid fuel flows to a pre-heating tube that vaporizes it before it reaches the burner. This sidesteps the problem of the canister cooling itself, and it keeps working in very cold conditions. Only use inverted mode on stoves designed for it. Feeding liquid into an ordinary burner can cause a dangerous flare-up.
Remote canister stoves. The canister connects by a hose and sits away from the burner. Many remote designs have a preheat tube that passes close to the flame, which warms the fuel, and they allow you to insulate or warm the canister separately. They are heavier, but they are stable and good for winter. See the best canister stoves for cold weather and the best remote canister stoves for the two main approaches.
Direct-thread upright stoves. Lightweight stoves that screw straight onto the canister are the most common and the most affected by cold. They work well to about freezing and then depend on technique.
Step-by-step cold-weather routine
- Choose the right canister. Use an isobutane/propane blend, ideally a cold-weather version. Avoid pure butane.
- Keep it warm before use. Store the canister in your sleeping bag or an inside pocket overnight. A canister at 40 degrees F starts far stronger than one at 10 degrees F.
- Insulate it from the ground. Set the canister on a foam pad, a piece of closed-cell foam or a small board. Cold ground sucks heat out through the metal base.
- Block the wind. Use a windscreen around the pot and burner, not around the canister itself in a way that traps heat from the flame. Follow your stove maker's guidance, since a wrap that reflects heat onto the canister can overheat it.
- Light at low flow, then increase. Start with a modest flame and let the canister warm slightly, then raise the burn rate. Running at maximum from the start chills the canister quickly.
- Use a lid and a heat exchanger pot. Boiling faster uses less fuel, which means less canister chilling.
- Swap canisters if needed. Keep a second canister warm in a pocket, and switch when the first one stalls. Warm the stalled one while you use the other.
- Do not overfill pot volume. A large amount of water takes longer and consumes more fuel, so melt snow first with a small amount, then add more.
- Stop and warm the canister if the flame weakens. Hold it in your hands or in a pocket for a few minutes, or set it in a pan of lukewarm water, never hot or boiling water.
- Turn off the stove and let it cool before swapping canisters. Do it away from open flames.
How much fuel to carry in the cold
Cold increases fuel use. You are melting snow, which takes much more energy than boiling water, and the stove is less efficient in wind and low temperatures. A typical planning figure for two people on a winter trip is about 100 to 200 g of fuel per day for cooking and melting snow, compared with 50 to 80 g per day in mild weather for simple boil-only meals. A 230 g canister may run a pair of campers for a day and a half in serious cold.
| Situation | Approx. fuel per person per day |
|---|---|
| Summer, boil water for freeze-dried meals | 40 to 60 g |
| Spring or fall, hot drinks and meals | 60 to 90 g |
| Winter with unfrozen water | 90 to 140 g |
| Winter, melting snow for all water | 150 to 250 g |
Add a margin of 25 percent for wind and for a canister that will not give up its last portion. Remember that the last 10 to 20 percent of a canister is often hard to use when cold, as most of the propane has already burned off, so plan on swapping before you run completely dry.
Warming a canister safely
People are tempted to hold a canister over a flame or put it in a pot of hot water. Do not. Fuel canisters are pressure vessels, and heating them raises the pressure rapidly. A canister heated to a high temperature can rupture or explode.
Safe ways to warm a canister:
- Hold it in your hands or under your jacket against your body.
- Put it in an inside pocket or a sleeping bag.
- Set it in a pan of lukewarm water that your hand can comfortably touch, for a short time, then dry it.
- Use a purpose-made insulating sleeve or a heat exchanger designed for the stove.
- Run a commercial remote-stove preheat tube as the manufacturer intended.
Never place the canister near an open flame, on a hot stove top, in a vehicle's heater vent or on a campfire. Do not wrap it in foil with the stove flame nearby.
Altitude, wind and stove placement
Altitude and cold often go together. At higher altitude, the lower air pressure lowers the boiling point of water, so cooking takes longer and uses more fuel, though the stove itself generally burns fine. Wind does the most damage. A stiff breeze can halve efficiency by blowing heat away from the pot, so a windscreen and a sheltered spot are as valuable as any fuel trick. Set up in the lee of a boulder, a pack or a snow wall. Put the stove on a stable, level base such as a flat stone or a board over snow, so it does not melt in and tip. Many stoves have a small footprint that sinks into soft snow.
Cooking tips for winter
- Pre-heat water with a pot cozy. Insulating the pot saves fuel.
- Use hot water meals. Freeze-dried and instant meals use less fuel than simmered ones.
- Keep the lid on. A lid cuts boil time significantly.
- Cook in the vestibule only with great care. Carbon monoxide and fire hazards make cooking inside a tent dangerous. See whether you can use a camping stove indoors for the safety issues involved.
- Melt snow with a little water already in the pot. Dry snow on a bare pot can scorch it.
- Insulate your sit pad. A stove on snow loses heat down, and so do you.
Alternatives when it is truly cold
Below about 0 degrees F, canisters are unreliable, and other fuels shine. White gas (liquid fuel) stoves are the standard for deep winter, because the fuel is pressurized by hand and does not depend on ambient temperature. Alcohol stoves also work in the cold if you prime them, though they are slower and less efficient. Compare the two designs in alcohol stove versus canister stove. Many winter campers carry both: a canister stove for convenience at moderate temperatures and a liquid-fuel stove as the cold-weather backup.
If you are shopping, see the best portable canister stoves, the best propane canister stoves and the best titanium canister stoves for the broad range of designs. Stoves differ in how much heat they deliver, which depends on their burner output. The number most listings give is BTU, which is explained in camp stove BTU ratings.
A worked example: a frosty morning at 20 degrees F
Picture two campers at 20 degrees F with a light breeze, a regulated stove and a half-full 230 g isobutane/propane canister that spent the night in the tent vestibule. They need 1.5 liters of boiling water for breakfast and coffee.
The canister has chilled to about 22 degrees F, so the first minute at full flame is a mistake: the burner roars, then fades to a weak blue ring as the canister frosts. Instead, the campers set it on a foam square, put up a windscreen and light the stove at roughly one third power. After a minute, the canister has stabilized, and they raise the flame to about two thirds. The pot, with a lid and a heat exchanger, boils in about five minutes. The fuel used is around 15 to 20 grams.
A second pass is where trouble starts. They refill and reheat, and the flame begins to sag again because the canister has been chilled by the first burn and the propane share has dropped. Rather than force it, one camper swaps in a second canister that has been sitting in an inner pocket, and the first goes into the pocket to recover. Alternating canisters keeps the stove at a healthy strength and costs nothing but a moment of attention.
The same breakfast at 5 degrees F demands more. A standard upright stove on a standard 80/20 canister may barely light. A remote stove with a preheat tube, a canister held in a lukewarm pan or a liquid-fuel stove removes the problem. The lesson is that cold performance is not a switch that flips at one temperature, it is a slide. Each tactic above buys you roughly 5 to 10 degrees of working range, and combining a warm canister, a windscreen, a regulated stove and a pot with a lid can move a stove's practical limit from the freezing mark down toward the single digits.
Reading fuel gauge signals in the cold
Cold makes it hard to know how much fuel remains. A canister that feels light might still hold a usable amount, and one that feels heavy may be unable to deliver because it is too cold. Weigh canisters on a small kitchen scale before the trip and write the full and empty weights on the side with a marker, since the empty weight is printed on most canisters. Subtract to find the fuel left. A canister that has frost on the outside while the stove is running tells you that evaporative cooling is working hard, and that you should reduce the flame or swap canisters. A flame that sputters and then recovers after a pause signals low pressure. A flame that dies and will not relight even when the canister is warmed usually means the canister is nearly empty.
Pre-trip testing
Test your stove and canister in the conditions you expect before you rely on them. On a cold evening, take the stove outside in your yard, set a pot of water and time how long it takes to boil with the canister at ambient temperature. Repeat with a warm canister. Time the result and note the fuel used by weighing the canister before and after. This test costs a few minutes and one canister and tells you exactly how much fuel to bring. It also lets you practice swapping canisters with gloves on, which is harder than it looks.
Budget and kit choices
For occasional shoulder-season trips, a regulated backpacking stove under $50 is plenty, and the best backpacking stoves under $30, the best backpacking stoves under $50 and the best backpacking stoves under $75 show how features change with price. If you plan to do real cooking rather than boiling water, the best backpacking stove for real cooking and the broader best backpacking stoves lists are worth a look. A kit for winter should include a windscreen, a canister cozy or foam pad, a lighter and a backup ignition source, since piezo igniters fail in the cold.
Common mistakes to avoid
- Using butane-only canisters in the cold. They stop working near freezing.
- Heating a canister with a flame or boiling water. It is a rupture risk.
- Starting on full flame. It chills the canister and weakens the flame.
- Leaving the canister in the car overnight. Start with a cold canister, and you start at a disadvantage.
- Inverting a canister on a stove that is not designed for it. Liquid fuel can cause a flare.
- Skipping a windscreen. Wind wastes fuel and slows cooking.
- Cooking in a closed tent. Carbon monoxide and fire risk are serious.
- Relying on a piezo igniter. Carry matches or a lighter.
Frequently asked questions
At what temperature does a canister stove stop working?
It depends on the blend and the stove. A standard isobutane/propane canister with a regulated stove works down to about 15 to 20 degrees F, while butane-heavy canisters struggle near 32 degrees F. Blend, wind, burn rate and how full the canister is all change the limit.
Can I warm a canister in my pocket?
Yes. Body heat is the safest and most common method. Keep the canister in an inner pocket or sleeping bag before use, and swap it with a second warm canister if the first cools. Never use an open flame or boiling water.
Is it safe to put a canister in warm water?
Lukewarm water that is comfortable to the touch is generally accepted for a short time, but avoid hot or boiling water, which can raise pressure too much. Dry the canister afterward, because wet metal chills faster.
Why does my stove flame get weaker as the canister empties?
Propane vaporizes first, so the blend shifts toward isobutane as you use the canister. Combined with evaporative cooling, that lowers pressure. A regulated stove, a warm canister and a lower burn rate help.
Should I use an inverted canister?
Only if your stove is designed for it, such as certain remote stoves with a preheat tube. For ordinary upright stoves, inverting the canister can cause a liquid fuel flare-up and is a safety hazard.
How many canisters should I bring for a winter weekend?
For two people melting snow, plan for roughly 150 to 250 g per person per day, so a 230 g canister per person per day is a conservative rule. Bring an extra canister as a margin for wind and for a canister that does not empty fully in the cold.
Sources & further reading
- MSR: The ins and outs of canister fuels
- REI: Snow Peak GigaPower 110 Gold fuel canister (stated cold-weather rating)
- Backpacking Light: Propane and cold temperatures
Image credits
- "JetBoil Camping Stove and MSR IsoPro Fuel Canister (54122725312)" by Tony Webster, CC BY 2.0, via Wikimedia Commons.
- "Cold Night - Bear Canisters and Stove (4896490485)" by Peretz Partensky from San Francisco, USA, CC BY-SA 2.0, via Wikimedia Commons.


Ready to buy?
Compare the gear: Camp Kitchen
5 Best Portable Canister Stoves in 2026
Best portable canister stoves that carry in a case, compared on fuel type, BTU, safety features and size for camp kitchens and road trips.
4 Best Propane Canister Stoves in 2026
Best propane canister stoves that burn 1 lb propane cylinders or mixed canisters, compared on BTU, wind protection and runtime.
4 Best Titanium Canister Stoves in 2026
Best titanium canister stoves compared on weight, regulation, wind control and pot support, for backpackers who count every gram.
4 Best Backpacking Stoves Under 30 in 2026
Best backpacking stoves under $30: ultralight canister and titanium alcohol stoves compared on weight, regulation, fuel and packed size for trail cooking.
6 Best Backpacking Stoves Under 50 in 2026
Best backpacking stoves under $50: titanium canister, alcohol and wood stoves compared on weight, regulator, igniter and fuel for trail cooking.
4 Best Backpacking Stoves Under 75 in 2026
Best backpacking stoves under $75: four premium titanium canister stoves, from a 2.5 oz Optimus to a GSI Pinnacle, compared on weight, regulation and design.
6 Best Backpacking Stoves in 2026
Backpacking stoves compared: ultralight canister, folding butane, compact propane and a wood-burning option, plus a windscreen to boost efficiency.
5 Best Backpacking Stove For Real Cooking in 2026
Best backpacking stoves for real cooking: five stoves and stove sets with adjustable burners, pots and pans for meals beyond boiling water.
Keep reading